Using the Camera for the First Time
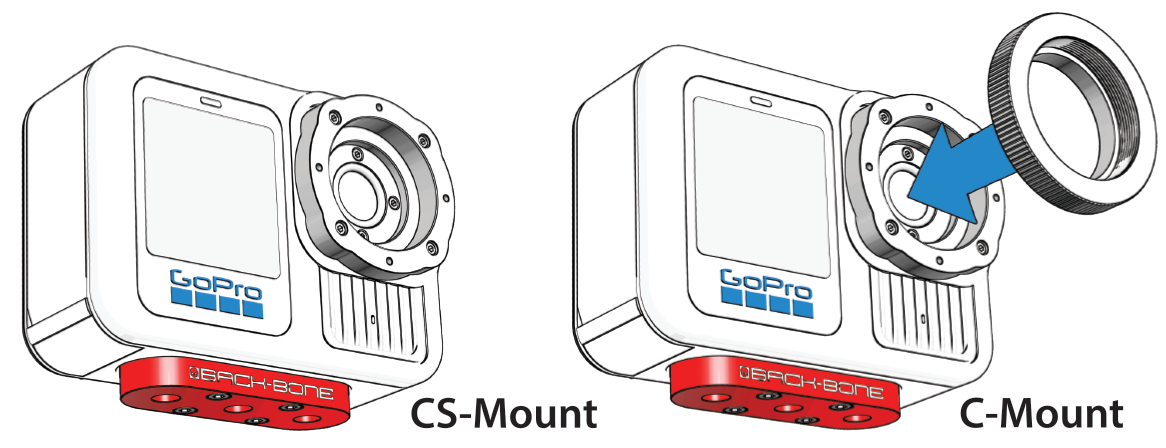
Remove the plastic cap from the C-Mount spacer ring. It is sometimes assumed that the metal spacer ring is a part of the cap but it’s actually required to properly focus C-Mount lenses. Without the spacer ring the camera can be used with CS-Mount lenses. We also recommend removing the C-Mount spacer ring when using the included M12 to CS-Mount adapter.
Cleaning & Changing Filters
Each camera comes with a protective glass filter installed. You may wish to remove this filter in order to clean, switch filter types or use an M12 lens that needs more room for proper focus. Replacement filters are available in the accessories section of our shop.
- Use the pointy end of the plastic spudger tool or some tweezers to gently pop out the O-ring holding the filter in place (spudger tool is located in the lid of the camera case)
- Turn the camera over and drop the filter into a microfiber cloth
- If required, clean the sensor. We recommend using a Lenspen MicroPro followed by an air puffer. You can also use some lens spray and a microfiber cloth followed by a puffer. The same tools can be used to clean the filter itself.
- Hold the filter by the edges. With the camera at a 45 degree angle gently drop the filter into the socket. Take care not to drop the filter edge first onto the sensor.
- Replace the O-ring using your spudger tool.
Using Lens Adapters
Crop Factor Information
- 1/2.3″ M12 – 1.0x
- 1/2″ C-Mount / M12 – 1.02x
- 1/1.8″ C-Mount / M12 – 1.15x
- 2/3” C-Mount – 1.41x
- 16mm (Bolex) – 1.63x
- Super 16 – 1.86x
- 1” C-Mount – 2.05x
- 1.1” C-Mount – 2.18x
- Micro Four Thirds – 2.77x
- APS-C – 3.42x
- DX – 3.64x
- APS-H – 4.42x
- 35mm (Full Frame) – 5.54x
For more information on crop factors please visit this page.
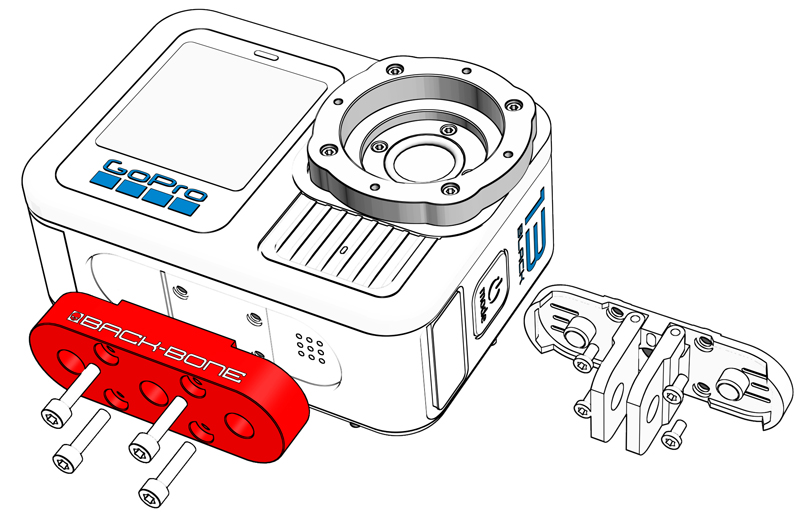
Switching the Base Mount
Support
Got a question about your camera? Get up and running with our help! Take a look at our Troubleshooting Guide or FAQ for some solutions to common problems, if the answer isn’t there drop us a line.
For more help with our product please visit www.back-bone.ca/support or email us
support@back-bone.ca
About Hypersmooth and Various Lens Modes
Hypersmooth
This is an excellent feature for stabilizing your footage, just keep in mind that it has some limitations when used with lenses other than the original GoPro lens it was designed for. As a general guide, like all forms of electronic image stabilization it will become less effective with more and more zoom. It works best with wide angle lenses but with longer focal lengths it’s recommended that you use a gimbal or tripod.
We also recommend trying out the free software ‘GyroFlow’. That software performs stabilization in post using the gyro data stored in the video files. It allows you to create a distortion profile for each of your lenses for a more accurate result. You also have access to a lot more tools to fine tune the output. You may find that you prefer to shoot with Hypersmooth turned off for maximum control in GyroFlow.
Linear Mode / Horizon Leveling
Linear modes are intended for use with a fisheye lens. When linear mode is enabled the camera firmware will correct for the fisheye distortion of the original GoPro lens. If you are already using a linear lens it will actually add a ‘pincushion’ distortion. For that reason we recommend using the camera’s ‘Wide’ setting for most shooting situations, or switch to a fisheye lens to take advantage of the horizon leveling feature. If horizon leveling is critical it can be done in post with any lens type using the free GyroFlow software mentioned above.
MAX Lens Mode
This mode is designed for GoPro’s MAX lens accessory which fits over top of the original lens. This mode is not useful with regular lenses, however it can be used with excellent results when using 190, 220 or 250 degree circular fisheye lenses. Circular fisheyes, such as those from Entaniya, work with H10PRO – H12PRO but compatibility with H9PRO cameras is limited.
Mounting M12 Lenses
Note: Some super wide angle and fisheye M12 lenses may not be compatible with the H9PRO – H13PRO. The M12 lenses in our shop clearly list their compatibility in the product details. As a general rule M12 lenses with a back focus distance of 2.3mm or under are not compatible. The H9PRO can’t accommodate lenses with a back focus distance of 3.2mm or lower.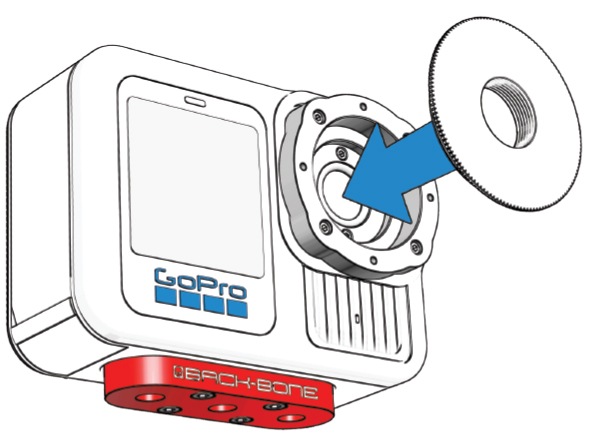
- Remove the C-Mount ring
- Screw the M12 to CS adapter ring onto the camera (Yellow Bag).
- Gently screw in your lens and check to see if it will focus. If it stops turning before it’s sharp you will need to remove the filter from the camera. If it still will not focus after removing the filter it likely has a back focus under 2.3mm and is not compatible (under 3.2mm on H9PRO). Take the lens back out.
- Thread the small black locking ring onto your lens.
- Screw the lens into the adapter until sharply in focus.
- It helps to connect the camera to a large screen via HDMI / Media Mod. If using the rear screen on the camera set the focus while zoomed in all the way in Photo mode. Zoom back out and take some pictures. Verify sharp focus across the entire image via GoPro app or PC.
- Tighten the locking ring against the adapter to lock the lens in place.
- You can also tighten the locking ring against the orange O-ring if desired.
TIPS
-
If your M12 lens feels a little loose inside the adapter, try wrapping a layer of Teflon tape around it. That will ensure a snug fit so that the lens is perfectly aligned with the image sensor. Teflon tape is cheap and readily available in the plumbing section of any hardware store.
-
Keep an air puffer and microfiber cleaning cloth in your shooting kit so you can blow debris out of the camera if needed and keep your lenses crystal clean.
Adding the Optional MFT Mount
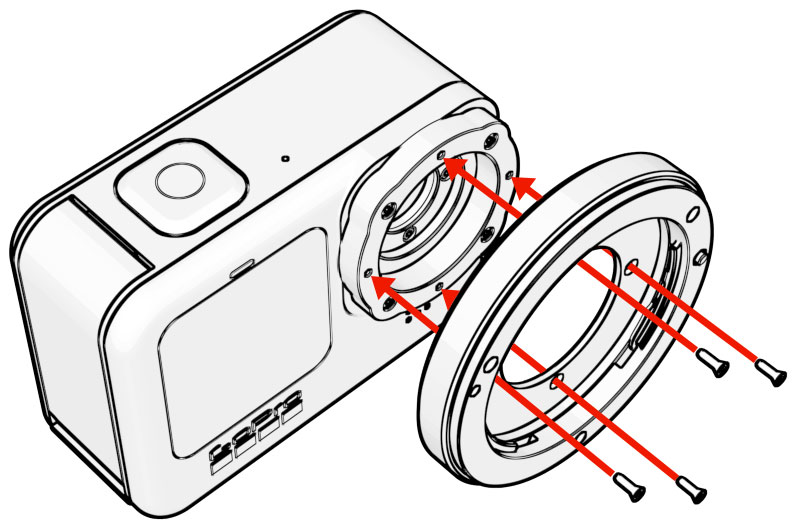
An optional adapter is available for your camera that allows fully manual Micro Four Thirds lenses to be used. Adding and removing the mount is quick and easy with the supplied T3 screw driver.
- Remove any lenses as well as the M12 adapter or C-Mount ring
- Take the MFT mount from the package and align it onto the CS-Mount ring so that the lens locking pin and release tab are on the right side
- Use the black T3 screw driver to add the 4 included steel screws.
